This is the multi-page printable view of this section.
Click here to print.
Return to the regular view of this page.
Keymaps
NXTKB keyboards use ZMK (Zephyr-based Modular Keyboard) firmware. ZMK keymaps let you define what each key does, organize keys into switchable layers, and assign tap-hold behaviors — all through customizable configuration files.
Default Keymaps
Each NXTKB keyboard comes with a pre-configured keymap optimized for its layout:
These pages contain visual layer diagrams and detailed explanations of each key function.
Customization
Want to change your keymap? See How to Update Keymaps for step-by-step instructions using ZMK Studio, the Keyboard Editor, or direct source code modification.
For more on ZMK, see the official ZMK documentation.
1 - Ferris Sweep Keymap
Introduction
The keymap images below are exported from keymap drawer, the latest keymap can also be viewed there.
The source code for this keymap is available at nxtkb/zmk-config-4-ferris-sweep, which provides the complete configuration for the NXTKB Ferris Sweep keyboard.
Keymap Layers
Characters (Default/Windows Layer)
- The default layer and windows layer is where you would type characters.
- they both have modifier keys
CTRL, OPTION (ALT), COMMAND (WINDOWS) sharing same position with character keys on your ring finger, middle finger and pointing finger on both hands. Hold the key to trigger the modifier, or tap the key to type in character.


Numbers and Navigation
- Hold the right tab to enter right layer, then you can type in numbers or do some navigation.
- Release your right tab to return to default or windows layer.
- Special keys:
&bootloader: make right part of the split keyboard enter bootloader, then you can copy in your new firmware.

Symbols (Punctuations)
- Hold the left tab to enter left layer, then you can type in punctuations.
- Release your left tab to return to default or windows layer.
- Special keys:
&default_report: type out battery information&bootloader: make left part of the split keyboard enter bootloader, then you can copy in your new firmware.MOUSE toggle: switch to mouse layer

Functions
- Hold both the left and right tab to enter tri layer, then you can type function keys.
BT 0 to BT 4: select position of bluetooth device you are connecting or want to connect with.BT CLR: clear the connection on selected position, then you can reconnect to this position with your device.OUT TOG: toggle between usb and bluetooth connection, so you can connect up to 6 devices (5 with bluetooth, and 1 with usb)WIN toggle: toggle windows layer, so you can switch between default and windows layer.&studio_unlock: unlock keyboard so that you can use zmk studio to setup keys&soft_off: enter soft off, like deep sleep which enters after an hour of inactivity, but soft off can only be woke up with wake up keys (set to left thumb key: shift)
- Release your tab keys to return to default or windows layer.

Mouse
- hold left tab (to enter left layer), and press space key to enter mouse layer
- press
p or q to quit mouse layer
MB4 is for going backward and MB5 is for going forward

References
2 - Ferris Sweep Pro Keymap
Introduction
The keymap images below are exported from keymap drawer, the latest keymap can also be viewed there.
The source code for this keymap is available at nxtkb/Sweep-Pro, which provides the complete configuration for the NXTKB Ferris Sweep Pro keyboard.
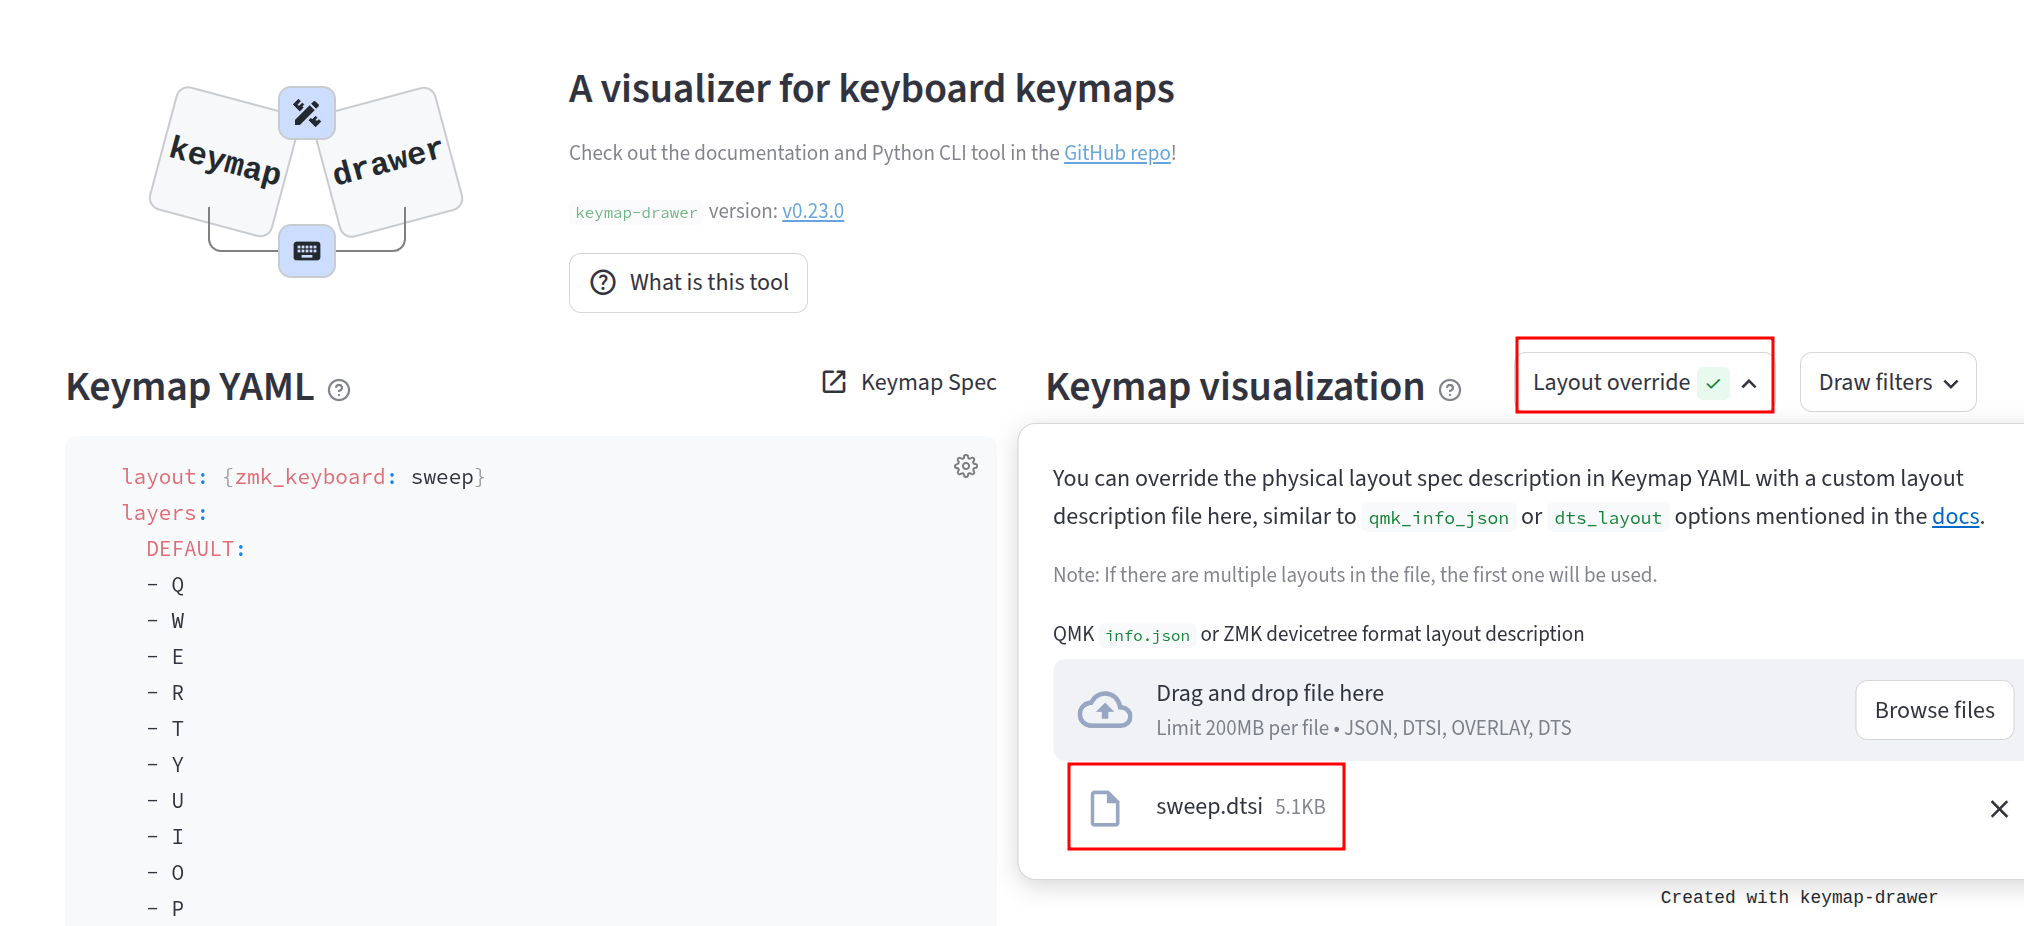
Note: Here we need to set the layout override with this file: sweep.dtsi:
Keymap Layers
Characters (Default/Windows Layer)
- The default layer and windows layer is where you would type characters.
- they both have modifier keys
CTRL, OPTION (ALT), COMMAND (WINDOWS) sharing same position with character keys on your ring finger, middle finger and pointing finger on both hands. Hold the key to trigger the modifier, or tap the key to type in character.
- left encoder:
- rotation: adjust volume
- click: toggle mute
- right encoder:
- rotation: adjust brightness
- click: unlock zmk studio


Numbers and Navigation
- Hold the right tab to enter right layer, then you can type in numbers or do some navigation.
- Release your right tab to return to default or windows layer.

Symbols (Punctuations)
- Hold the left tab to enter left layer, then you can type in punctuations.
- Release your left tab to return to default or windows layer.
- Special keys:
&default_report: type out battery informationMOUSE toggle: switch to mouse layer

Functions
- Hold both the left and right tab to enter tri layer, then you can type function keys.
BT 0 to BT 4: select position of bluetooth device you are connecting or want to connect with.BT CLR: clear the connection on selected position, then you can reconnect to this position with your device.OUT TOG: toggle between usb and bluetooth connection, so you can connect up to 6 devices (5 with bluetooth, and 1 with usb)WIN toggle: toggle windows layer, so you can switch between default and windows layer.&studio_unlock: unlock keyboard so that you can use zmk studio to setup keys&soft_off: enter soft off, like deep sleep which enters after an hour of inactivity, but soft off can only be woke up with wake up keys (set to left thumb key: shift)
- Release your tab keys to return to default or windows layer.

Mouse
- hold left tab (to enter left layer), and press space key to enter mouse layer
- press
p or q to quit mouse layer
MB4 is for going backward and MB5 is for going forward

3 - How to Update Keymaps
There are three methods to update keymaps for NXTKB keyboards. We recommend Method 1 (fork and modify repository) for permanent changes and Method 3 (ZMK Studio) for quick adjustments without re-flashing.
Method 1: Fork and Modify Configuration Repository (Recommended for Permanent Changes)
This method involves forking the official configuration repository, making your changes, and then flashing the updated firmware.
Steps:
- Fork the appropriate configuration repository:
- Modify the keymap files in the repository
- GitHub Actions will automatically compile the firmware
- Flash the new firmware to your keyboard
Note: This method requires re-flashing the firmware after making changes, but provides full control over your configuration and is ideal for permanent keymap changes. For detailed instructions on flashing firmware, see How to Flash a Firmware.
Method 2: ZMK Studio (Recommended for Quick Adjustments)
ZMK Studio allows you to modify keymaps and store them directly on your keyboard without needing to re-flash the firmware.
Steps:
- Visit ZMK Studio
- Connect your keyboard via Bluetooth
- Make your desired keymap modifications
- Save the changes directly to your keyboard’s storage
Note: This method does not require firmware re-flashing, making it ideal for quick adjustments, testing, and temporary configurations.
Method 3: Keyboard Editor with Forked Repository (Alternative Approach)
This method uses the Keyboard Editor integrated with your forked repository for a more streamlined workflow.
Steps:
- Fork the appropriate configuration repository:
- Open the Keyboard Editor
- In the Keyboard Editor, connect to your forked repository:
- Click “GitHub” → “Connect to GitHub”
- Authorize the editor to access your forked repository
- Select your forked repository and the appropriate keymap file
- Make your desired keymap modifications in the editor interface
- Save changes - the editor will automatically:
- Commit the changes to your forked repository
- Push the commit to GitHub
- Trigger the GitHub Actions workflow to build the new firmware
- Once the build completes, download the firmware files from the GitHub Actions artifacts
- Flash the new firmware to your keyboard
Note: This method still requires re-flashing the firmware after modifying the keymap, and has some limitations:
- The Keyboard Editor may not recognize all ZMK-specific features, custom macros, or advanced key behaviors
- Some existing key definitions might be lost or misinterpreted during the editing process
- For complex configurations, Method 1 (direct repository editing) is more reliable
- For detailed instructions on flashing firmware, see How to Flash a Firmware.